


 2026-07-28
 228
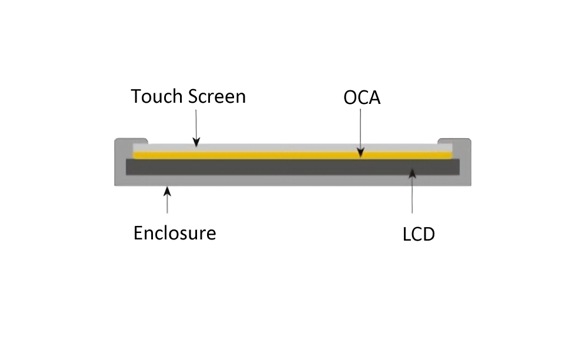
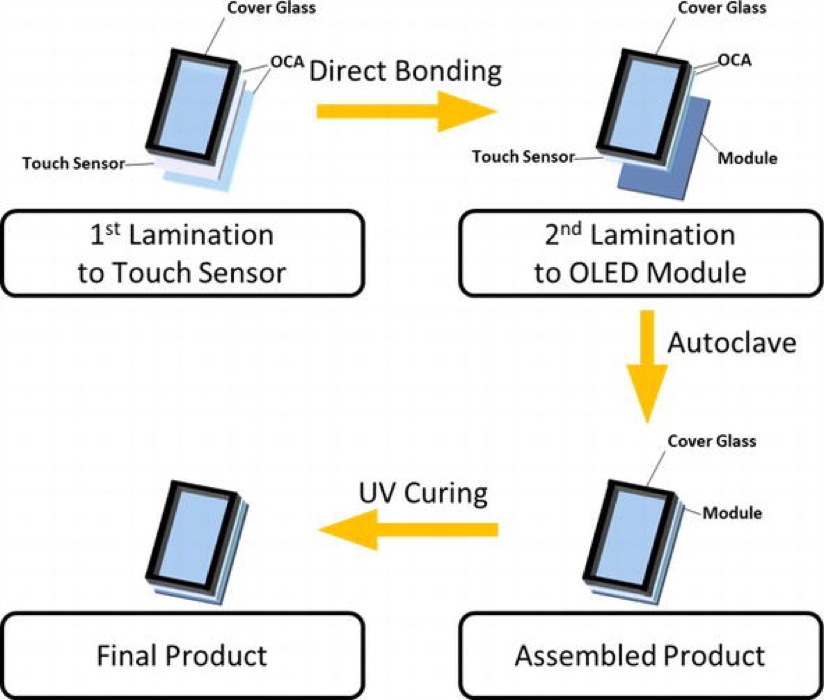
228 OCA full lamination is the mainstream bonding process for AG/AR/AF touch cover glass and LCD/OLED display panels. Compared with traditional air gap frame bonding, OCA lamination greatly improves light transmittance, touch precision and dustproof performance, but manufacturers often face low yield problems such as air bubbles, dust spots and misalignment. This article systematically sorts out standard cleanroom environment requirements, standardized lamination process, core equipment parameters and troubleshooting methods to help touch screen factories improve finished product yield.
Compared to traditional air-gap (frame) bonding, OCA full lamination offers:
Higher light transmittance (typically ≥92–99%)
Reduced reflections and improved contrast (true “all-black” effect)
Better mechanical strength and dust resistance
Enhanced touch accuracy with minimal parallax
OCA film bonding is particularly valued for its speed, reworkability (before final curing), and suitability for flat to moderately curved surfaces.
Core pain points: Dust ingress, dead air bubbles, misalignment, LCD damage, ribbon cable damage, touch malfunction, and edge bounce bubbles.
Use a simple clean workbench as much as possible. Close fans, doors, and windows to minimize air movement and dust.
Humidity: 40%–60% (high humidity easily creates moisture bubbles). Wear nitrile cleanroom gloves throughout the entire process. Never touch the LCD surface or OCA adhesive surface with bare hands.
Required Accessories:
Dedicated alignment jig/mold, silicone buffer pad, cleanroom wipes, 95% isopropyl alcohol / 530 cleaner, anti-static dust removal film.
Use a cleanroom wipe dampened with cleaner. Wipe from the center outward in a single direction only — do not wipe back and forth.
Focus on cleaning residual old glue debris and dust particles at the edges.
Immediately after cleaning, use anti-static dust removal film to lightly pick up any floating dust.
2) Alignment & Positioning
Two Methods: Mold alignment / Suspended manual alignment
Place the LCD steadily into the positioning mold. Reserve space for the FPC (flex cable). Do not press or bend the FPC.
Slowly peel off the OCA release film from the one-piece cover glass. Peel slowly to reduce static electricity that attracts dust.
First align the camera hole, earpiece slot, and left/right bezels. Keep the cover suspended above the LCD — do not press down directly!
Key Technique:
Apply easy-tear tape on both ends as temporary suspension stops. Confirm even gaps on all four sides, then gently make initial contact at the center to avoid premature local bonding that traps air.
Prohibited Action:
If alignment is off, do not forcefully peel and re-attach. This will stretch the OCA, create permanent wrinkles and dead bubbles, and ruin the cover glass.
Direct Face Initial Inspection After Bonding: Slowly release pressure and remove the device; check at an angle with light: for black spots, gray bubbles, edge bubbles, localized Newton's rings, and cover plate misalignment. Dead bubbles caused by dust cannot be removed and require rework!
High-Pressure Debubbling, Debubbling machine parameters:
Pressure: 0.3–0.4MPa, Temperature: 40–45℃
Time: Straight surface 20–30min; Curved surface 30–40min
Small bubbles and edge air bubbles can be eliminated; bubbles with black spots or dust, and OCA wrinkled bubbles (dead bubbles) cannot be eliminated.
Do not install immediately after debubbling; let it stand at room temperature for 15–30 minutes before testing.

Copyright © 2026 Fuxin Glass (Dongguan City) Technology Co., Ltd. All Rights Reserved